If you’re a home service provider or run an e-commerce site, chances are you’ve wondered, how can I capture more leads and track user interactions efficiently? Integrating PowerChats with GTM – Google Tag Manager is one of the most effective ways to achieve that.
This integration not only automates customer interactions through intelligent chatbots but also helps you monitor every user engagement, giving you deeper insights into your website’s performance.
By the end of this guide, you’ll know exactly how to set up PowerChats, integrate it with GTM, and use this combination to improve customer engagement and track conversions. Let’s dive into the step-by-step process and how it can benefit your business.
Understanding PowerChats and Its Benefits for Service-Based Businesses
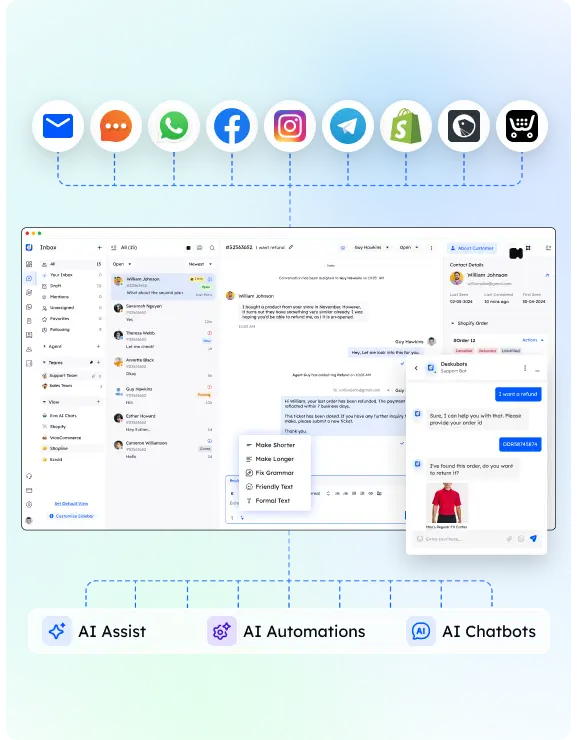
PowerChats is an AI-powered chatbot designed to improve lead capture, customer service, and overall engagement for service-based businesses.
Whether you’re running a home services company like HVAC or plumbing, or a growing e-commerce site, PowerChats can streamline your customer interactions and automate a lot of the work your support team usually handles.
Key Features of PowerChats:
- Lead Capture Automation:
- PowerChats allows you to engage website visitors in real-time. Instead of waiting for someone to fill out a contact form, the chatbot interacts immediately, collecting crucial lead information that helps boost your conversion rates.
- Customizable Chat Flows:
- Businesses can design chat flows to respond to common customer inquiries, offering multiple paths based on user responses. For example, an HVAC company can have a chat flow that asks visitors if they need emergency repairs, scheduling, or general inquiries.
- Seamless Integration:
- PowerChats integrates with various tools like Google Tag Manager (GTM), CRMs, and Facebook Messenger. This makes it easier for businesses to track leads, manage customer data, and offer consistent communication across platforms
- Affordable and Scalable:
- PowerChats is designed to work at a fraction of the cost of traditional live chat services while scaling to handle thousands of chats simultaneously. For small and medium-sized businesses with limited resources, this means better customer service without added strain on your team.
Why This Matters for Your Business:
For home service providers and service-oriented businesses, speed and availability are key to converting website visitors into leads.
With PowerChats, potential customers can quickly engage with your business, get their questions answered, and even schedule services—all without requiring manual intervention.
This not only increases conversion rates but also improves customer satisfaction by providing an immediate response to their inquiries.
Ready to dive into the setup process for PowerChats? Let me know if you want to continue!
Integrating PowerChats with GTM – Complete Process
Now that both PowerChats and Google Tag Manager (GTM) are set up, it’s time to integrate the two. This process involves adding the PowerChats script to GTM, configuring the tag, and ensuring the chatbot appears on your website as intended.
Step-by-Step Integration:
- Create a New Tag in GTM:
- Log in to your GTM account and navigate to the “Tags” section on the dashboard.
- Click the “New” button to create a new tag, and give it a descriptive name like “PowerChats Chatbot.”
- Select Custom HTML as the Tag Type:
- When prompted to choose a tag type, select “Custom HTML”. This will allow you to insert the PowerChats script that was generated earlier.
- Insert the PowerChats Script:
- Paste the PowerChats script that you copied from the Integration section of your PowerChats dashboard into the Custom HTML field in GTM.
- Set the Trigger:
- Under the “Triggering” section, click “Add Trigger”. Select “All Pages” as the trigger so that the chatbot will appear on every page of your website. This ensures maximum visibility and engagement with all visitors.
- Save and Preview:
- Once you’ve configured the tag and added the trigger, click “Save”. Then, hit the “Preview” button to test the integration. This allows you to see the changes on your website before making them live.
- Open your website in a new tab while preview mode is active to check if the PowerChats bot appears correctly and functions as expected. Test various interactions to ensure they are being tracked.
- Publish the Changes:
- After confirming that everything works as it should, go back to the GTM dashboard and click “Submit” to publish the changes. This will make the PowerChats bot live on your website.
- You’ll now be able to track all interactions via Google Tag Manager and gain insights into how users engage with your chatbot.
At this point, PowerChats should be fully integrated into your website using GTM. You can now track user interactions, measure conversion rates, and analyze the effectiveness of the chatbot through GTM’s powerful analytics.
Step-by-Step Guide to Setting Up PowerChats
Now that you understand the benefits of using PowerChats for your business, let’s get into the technical part—setting it up and making sure it’s ready to integrate with GTM. This section will cover creating a PowerChats account, generating your script, and customizing it to fit your business needs.
1. Creating a PowerChats Account
If you haven’t created an account yet, follow these steps to get started:
- Sign Up: Visit the PowerChats website and click on “Sign Up” to create your account. You’ll need to fill in basic information such as your name, email address, and company details.
- Initial Configuration: After logging in, you’ll be prompted to configure your chatbot. This includes naming the bot, selecting its language, and enabling any additional features like voice capabilities or SMS alerts.
- Customize Chat Flows: Use the chat flow editor to design how the chatbot interacts with visitors. Start with a welcome message, then create various pathways for different responses. For example, you can direct a customer needing immediate assistance to a scheduling option or an FAQ section for general inquiries.
2. Generating the PowerChats Script
Once you’ve set up your account and customized your chat flows, the next step is to generate the PowerChats script.
- Access the Integration Section: Log in to your PowerChats dashboard and navigate to the “Integration” section.
- Generate the Script: Click “Generate Script” to create the code you will use to embed the chatbot on your website.
- Customizing the Script: Before adding the script to GTM, you might want to tweak it to align with your website’s design and behavior. For instance, you can adjust chat triggers or modify the appearance to match your branding.
By now, you should have a functioning chatbot and the necessary script to integrate it into your website using GTM.
Google Tag Manager: Set-Up and Overview
Google Tag Manager (GTM) is an essential tool for managing tags on your website, like tracking scripts, analytics, or chat tools such as PowerChats. It allows you to integrate PowerChats without directly modifying your website’s code, making it easier to track user interactions and conversions.
1. Why GTM Matters for Service-Based Businesses
Using GTM enables you to:
- Track Customer Interactions: With PowerChats integrated through GTM, every interaction your visitors have with the chatbot can be tracked and analyzed. This includes how many leads were captured, how long customers engaged, and what actions they took during the chat.
- Simplify Tag Management: GTM allows businesses to manage multiple scripts and tools in one place. You don’t need to access the website’s backend every time you want to make changes or add new tracking tools.
2. Setting Up Google Tag Manager (GTM)
If you don’t already have a GTM account, here’s how to set it up:
- Create a GTM Account: Go to the Google Tag Manager website and sign up using your Google account. Once registered, you’ll be prompted to create a container, which is where your tags (like the PowerChats script) will live.
- Container Setup: During the setup, name your container and choose the platform you’re targeting (e.g., Web for websites). After this, GTM will generate a code snippet that you’ll need to install on your website. This snippet allows GTM to manage all the tags you’ll be adding.
- Installing GTM on Your Website: Follow the instructions provided by GTM to place the generated code in your website’s header and body sections. If you’re using a CMS like WordPress, there are plugins available to simplify this step.
Maximizing the Benefits of PowerChats and GTM Integration
Once the integration is live, there are several ways to leverage PowerChats and Google Tag Manager (GTM) to get the most out of your chatbot and tracking capabilities. Here are some best practices to maximize the value for your business:
1. Lead Tracking and Conversion Monitoring
With the PowerChats chatbot in place, you can use GTM to track specific events and conversions that occur through the chatbot. Here’s how to make the most of this feature:
- Custom Event Tracking: Set up custom GTM triggers to track actions such as:
- When a user starts a chat.
- When a lead is captured (e.g., when a visitor submits their contact information).
- When a user completes a desired action, like scheduling an appointment.
- Conversion Funnels: Use GTM’s data layers to visualize user paths through your website and how they interact with the chatbot. You can set up funnels to see where users drop off and where they convert, giving you actionable insights into improving the user experience.
2. Improving Customer Experience with Real-Time Notifications
One of the key benefits of PowerChats is real-time interaction. You can improve response time and customer satisfaction by utilizing features like:
- Real-Time Notifications: PowerChats can send chat notifications via email or SMS to notify your team when a visitor starts a chat. This allows for immediate intervention when necessary, or you can let the AI handle the entire conversation.
- Switching Between AI and Live Chat: GTM allows you to monitor when human intervention might be necessary. Set up custom triggers that notify your team if a visitor asks specific, complex questions that the AI chatbot might not handle well.
3. Using GTM for Advanced Analytics
GTM provides a range of tools for in-depth analysis of customer interactions:
- Tag Customization for Advanced Data: Customize tags within GTM to collect deeper insights, such as tracking how long users engage with the chatbot, which pages generate the most chatbot activity, and which chat flows convert better.
- Integration with Google Analytics: Sync your GTM with Google Analytics to get a comprehensive view of user interactions across the entire website. This allows you to correlate chatbot interactions with overall website behavior and pinpoint the most effective strategies for lead generation.
4. Optimizing Chatbot Performance
Once you have sufficient data from GTM, you can begin optimizing the chatbot for better results:
- A/B Testing Chat Flows: Run A/B tests on different chat flows and track their performance using GTM triggers. This will help you determine which conversation paths lead to higher conversion rates.
- Adjusting Triggering Conditions: If your chatbot is not getting enough engagement, use GTM to adjust when and where the chatbot appears. For instance, you might want to trigger the chatbot only after a visitor has spent a certain amount of time on the site or has scrolled to a particular section.
By fully leveraging GTM’s tagging and analytics capabilities, you’ll gain a much deeper understanding of how your chatbot is performing and where you can make improvements.
This integration not only streamlines customer service but also provides actionable insights for optimizing lead generation and customer engagement.
Frequently Asked Questions (FAQs)
Can I track specific customer interactions with PowerChats via GTM?
Yes, you can track specific actions within the PowerChats bot using GTM’s event tracking feature. For example, you can monitor when a visitor initiates a chat, submits their contact information, or completes a lead form. Setting up these events in GTM allows you to measure the chatbot’s impact on lead generation and customer engagement(
2. Is it possible to customize how and when the PowerChats bot appears using GTM?
Yes, with GTM, you can create custom triggers to control when the chatbot appears on your website. For instance, you can set the bot to display after a visitor has spent a certain amount of time on a page, or only after they’ve scrolled past a specific section. This helps ensure that the chatbot interacts with visitors at the right time(