Migrating from Magento to Shopify can feel overwhelming, but with the right checklist, you can ensure a smooth transition to your new Shopify store. This guide is here to walk you through every step of the migration process, helping you move your store data—like customer accounts, product data, and more—securely and efficiently.
In this post, we’ll break down a comprehensive Magento to Shopify migration checklist to help you avoid data loss, maintain your SEO rankings, and set up a fully functional Shopify store with ease. Let’s dive into the to Shopify migration checklist and simplify the entire journey.
Why Migrate from Magento to Shopify?
Switching from Magento to Shopify offers several advantages for businesses looking for a more user-friendly and efficient ecommerce platform. Here’s why many online store owners are making the shift:
1. Ease of Use
Shopify’s intuitive admin panel simplifies the management of your new Shopify store, making it ideal for businesses without extensive technical expertise. Unlike the Magento admin panel, Shopify offers a more straightforward interface, reducing the learning curve for your team.
2. Extensive App Ecosystem
The Shopify App Store provides a wide variety of tools to enhance your online store. From inventory management to custom integrations, you’ll find apps to streamline processes that often require manual effort on a Magento website.
3. Enhanced Performance
Shopify’s hosted solution ensures fast load times and consistent uptime, which can be challenging to achieve on self-hosted platforms like Magento. This results in a better shopping experience for customers on your Shopify website.
4. Scalability and Flexibility
Whether you’re migrating a simple store or handling complex migrations, Shopify’s robust infrastructure supports businesses of all sizes. With Shopify themes and tools designed for customization, you can tailor your new online store to match your brand seamlessly.
5. SEO and Marketing Tools
Shopify is optimized for search engines, giving you an edge in organic rankings. Features like Google Analytics integration and built-in SEO settings make it easier to retain traffic and visibility when moving from a Magento site.
6. Seamless Payment Solutions
With integrated Shopify Payments, you can accept payments securely and offer customers a variety of methods, ensuring a hassle-free checkout experience.
Switching from a current Magento store to Shopify is not just a platform change; it’s an upgrade to better functionality and user experience. In the next section, we’ll start planning the migration process to ensure a seamless transition for your business.
Pre-Migration Planning for a Smooth Transition
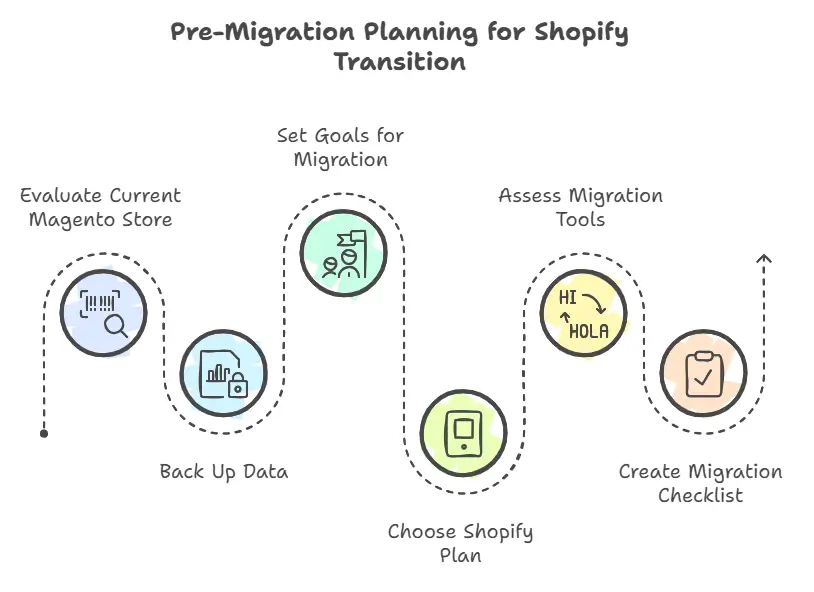
Before diving into the actual migration, careful planning is essential to ensure that your to Shopify migration goes smoothly. Here’s a step-by-step plan to prepare your Magento store for the big move.
1. Evaluate Your Current Magento Store
Start by analyzing your current Magento website to identify critical data and components to migrate, such as:
- Product data (e.g., SKUs, descriptions, categories)
- Customer data (e.g., emails, purchase history, customer accounts)
- Magento URLs to ensure proper redirection
- Inventory and sales reports
This evaluation will help you prioritize the information to transfer and avoid unnecessary clutter in your new online store.
2. Back Up Your Data
Backing up all your data ensures you can recover it if something goes wrong during the migration process. Key elements to back up include:
- Magento database
- Media files like images and videos (media backup)
- Custom settings and Magento extensions
You can use the Magento admin panel or a reliable system backup tool to store this data securely.
3. Set Goals for Migration
Define what you want to achieve with the to Shopify migration. For example:
- Improved user experience with a new Shopify theme
- Better SEO performance with optimized Shopify URLs
- Enhanced functionality using tools from the Shopify App Store
Clear goals will help you focus on what matters most during the migration.
4. Choose the Right Shopify Plan
Shopify offers multiple pricing plans to suit businesses of all sizes. Select a plan that meets your needs, taking into account features like inventory management, payment options, and access to the Shopify theme store.
5. Assess Tools for Automated Migration
For a quicker and more accurate data migration, consider using migration apps or a Shopify migration service. These tools help export data from your Magento store and import data into your new Shopify store with minimal effort. Popular tools include:
- LitExtension
- Cart2Cart
- Shopify’s native migration tool
6. Create a Checklist
Draft a detailed Magento to Shopify migration checklist to stay organized. This should include tasks like:
- Backing up data
- Preparing a list of third-party apps for migration
- Mapping Magento URLs to Shopify equivalents
- Testing the Shopify platform before launch
By investing time in pre-migration planning, you can prevent issues like data loss and downtime. In the next section, we’ll dive into the actual data migration process to transfer your store data to Shopify efficiently.
Data Migration Process: Transferring Your Store Data to Shopify
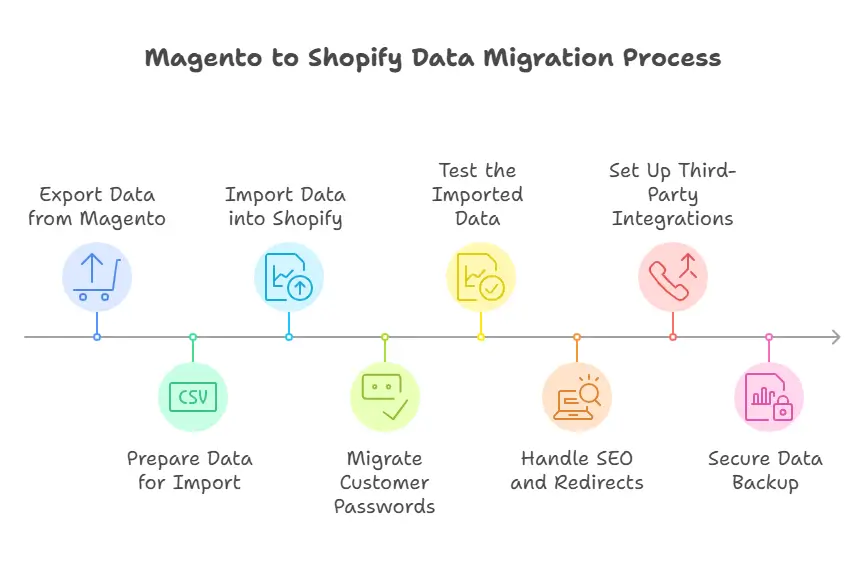
Migrating data is the most critical part of your Magento to Shopify migration. With careful execution, you can ensure all your store data, including customer accounts and product data, transfers seamlessly. Follow these steps for an efficient data migration process:
1. Export Data from Magento
Start by exporting key data from your current Magento store. Use the Magento admin panel to export:
- Product data: SKUs, descriptions, categories, prices
- Customer data: Contact information, purchase history, passwords
- Orders and transaction history
Typically, this data is saved in a CSV file format, which is compatible with Shopify.
2. Prepare Data for Import
Before importing data into Shopify, clean and organize the exported data:
- Verify the CSV file structure matches Shopify’s import requirements.
- Remove duplicate or outdated entries.
- Map categories and tags to Shopify’s format for better organization in your new Shopify store.
3. Import Data into Shopify
Use Shopify’s built-in tools or migration apps to upload the prepared data. The Shopify admin interface allows for easy data import, including:
- Products and inventory
- Customers and orders
- Images and media files
Migration apps like Cart2Cart or LitExtension can automate this process, ensuring a smoother experience for large or complex migrations.
4. Migrate Customer Passwords
Shopify doesn’t directly support importing customer passwords due to encryption protocols. To handle this:
- Notify customers via email to reset their passwords on your new Shopify store.
- Use Shopify’s tools to send secure password reset links.
5. Test the Imported Data
After the data import, thoroughly check your Shopify admin panel to confirm:
- All products are displayed with correct prices, descriptions, and images.
- Customer accounts are set up with accurate purchase histories.
- Orders and transaction details are complete.
This step helps catch and fix any discrepancies early.
6. Handle SEO and Redirects
To maintain search engine rankings, set up 301 redirects for your old Magento URLs to the corresponding pages on Shopify. Shopify’s SEO tools make it easy to ensure your online store retains visibility.
7. Set Up Third-Party Integrations
Reconfigure your third-party apps, payment gateways, and custom integrations to work with Shopify. For example:
- Migrate analytics tools like Google Analytics.
- Reconnect inventory systems for inventory management.
8. Secure Data Backup
After migration, back up the imported data on your Shopify platform. This ensures your store data is protected as you transition to the live environment.
A successful data migration is the foundation of a fully functional Shopify store. In the next section, we’ll guide you through setting up and customizing your new online store to get it ready for customers.
Setting Up Your New Shopify Store
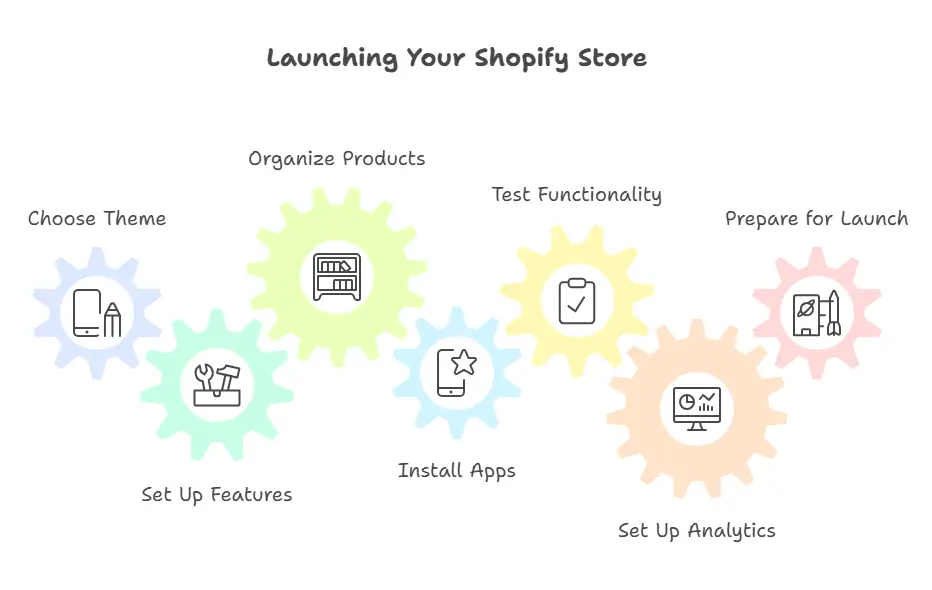
With your data successfully migrated, it’s time to set up and customize your new Shopify store. This step ensures your store looks and functions as expected, creating a seamless shopping experience for your customers.
1. Choose and Customize a Shopify Theme
Shopify’s theme store offers a variety of free and paid options. To select the right theme for your store:
- Browse themes that match your industry and branding.
- Consider features like mobile responsiveness and layout flexibility.
- Customize the theme using Shopify’s drag-and-drop editor to align with your brand identity.
Pro Tip: Ensure your Shopify website reflects your brand’s color scheme, fonts, and overall style for a consistent look.
2. Set Up Essential Store Features
Configure key settings to ensure your Shopify platform is ready for business:
- Payment Gateways: Activate Shopify Payments or integrate with other providers to accept a variety of payment methods.
- Shipping Settings: Define shipping zones, rates, and carriers.
- Taxes: Enable tax calculations based on your location and business model.
These settings can be managed through the Shopify admin panel.
3. Organize Product Categories
After importing your product data, create a logical category structure for your new store:
- Group similar products together for easier navigation.
- Use tags and collections to organize items.
- Update product descriptions and images for consistency.
4. Install Apps from Shopify App Store
Shopify’s app ecosystem helps enhance your store’s functionality. Consider installing apps for:
- Inventory management to track stock levels.
- SEO optimization to boost search engine visibility.
- Marketing tools for email campaigns and social media integration.
Apps like Oberlo, Klaviyo, and Privy are popular among Shopify users.
5. Test Store Functionality
Before going live, test every aspect of your new Shopify store to ensure it runs smoothly:
- Complete a test purchase to verify the checkout process.
- Check links, forms, and contact pages.
- Review the mobile version for responsiveness and ease of use.
6. Set Up Analytics and Tracking
Integrate tools like Google Analytics to monitor traffic and performance. Shopify also offers built-in reporting tools to help you track sales, customer behavior, and marketing efforts.
7. Prepare for Launch
Finalize your Shopify website by:
- Configuring DNS settings to point your domain to Shopify.
- Testing your store under different conditions to check for bugs.
- Informing your customers about the transition to your new online store.
Common Challenges in Magento to Shopify Migration and How to Overcome Them
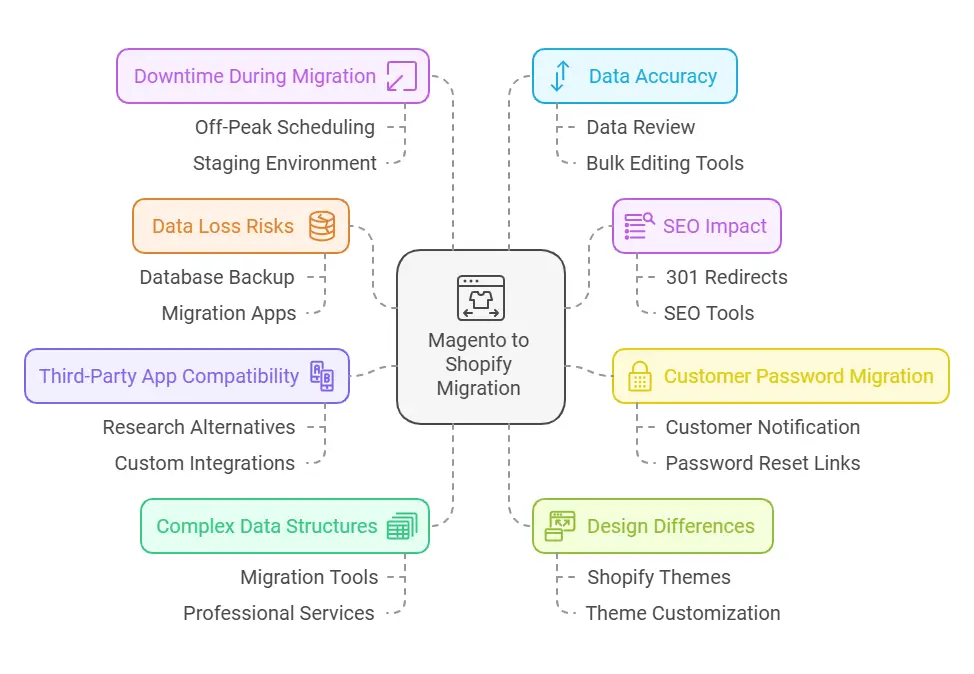
Migrating from Magento to Shopify can come with its share of challenges. Knowing what to expect and how to address these issues will ensure a smooth transition for your online store. Below are some common migration hurdles and practical solutions to tackle them.
1. Data Loss Risks
Challenge: Losing critical store data, such as customer accounts, orders, or product data, can disrupt your business operations.
Solution:
- Perform a database backup of your Magento store before starting the migration process.
- Use automated migration apps or hire a professional migration service with a proven track record to handle data transfers.
- Test the imported data in your Shopify admin panel to ensure accuracy.
2. SEO Impact
Challenge: Improper handling of URLs and metadata can lead to a drop in search engine rankings after migration.
Solution:
- Set up 301 redirects from your Magento URLs to your new Shopify pages to retain SEO value.
- Optimize product and category pages with fresh meta tags and descriptions.
- Use Shopify’s built-in SEO tools to fine-tune your content and structure.
3. Customer Password Migration
Challenge: Customer passwords cannot be directly migrated due to encryption differences between platforms.
Solution:
- Inform customers in advance about the migration and ask them to reset their passwords on the new Shopify store.
- Use Shopify’s email tools to send secure password reset links to all customers.
4. Third-Party App Compatibility
Challenge: Extensions and third-party apps used in Magento may not have direct equivalents on Shopify.
Solution:
- Identify critical extensions and research alternatives in the Shopify App Store.
- Work with developers to create custom integrations if needed.
- Test new apps to ensure they meet your requirements before launch.
5. Complex Data Structures
Challenge: Handling complex migrations, such as transferring large volumes of data or unique configurations, can be time-consuming.
Solution:
- Use tools like LitExtension or Cart2Cart for efficient and error-free data migration.
- For highly customized stores, consider hiring professional Shopify migration services to handle the process.
6. Design Differences
Challenge: The design of your Magento website may not directly translate to Shopify’s themes.
Solution:
- Choose a flexible Shopify theme from the Shopify theme store that matches your branding.
- Customize the theme using Shopify’s drag-and-drop editor or hire a developer for advanced design needs.
7. Downtime During Migration
Challenge: Downtime can result in lost sales and a negative customer experience.
Solution:
- Schedule the migration during off-peak hours to minimize disruptions.
- Test your new store in a staging environment before going live to ensure all systems are functional.
8. Data Accuracy
Challenge: Transferred data, such as prices, inventory levels, or customer details, may contain errors.
Solution:
- Review all imported product data and customer data for accuracy.
- Use Shopify’s bulk editing tools in the Shopify admin to make quick updates.
By anticipating these challenges and implementing these solutions, you can ensure a seamless Magento to Shopify migration.
Conclusion: Magento to Shopify Migration Checklist
Migrating from Magento to Shopify is a key step toward optimizing your online store for better performance and user experience. Follow these steps for a seamless transition:
Plan Ahead: Evaluate your current Magento store, back up data, and set clear migration goals.
Migrate Data: Use reliable tools or services to transfer customer accounts, product data, and other assets.
Set Up Shopify: Customize a Shopify theme, configure payments, and organize inventory.
Test and Optimize: Verify data accuracy, redirect Magento URLs for SEO, and monitor performance.
Overcome Challenges: Anticipate issues like data loss and password migration, and use professional support for complex migrations.
With careful preparation and execution, your new Shopify store will be ready to deliver an enhanced shopping experience and support your business growth.
FAQs About Magento to Shopify Migration
Q: Can I migrate my customer passwords from Magento to Shopify?
A: No, due to encryption differences. Customers will need to reset their passwords on the new Shopify store using secure links provided by Shopify.
Q: What tools can I use for Magento to Shopify migration?
A: Popular tools include LitExtension, Cart2Cart, and Shopify’s native migration app. These tools help automate the process and reduce errors.
Q: How do I ensure my SEO rankings are maintained during migration?
A: Use 301 redirects to map your Magento URLs to Shopify, optimize your meta tags, and submit a new sitemap to search engines.
Q: Should I use professional migration services?
A: For complex migrations or large stores, professional services with a proven track record can save time and minimize risks.
Q: How long does the migration process take?
A: Depending on the size of your store and complexity, it can take a few days to weeks. Pre-migration planning and the right tools can speed up the process.
