Key Takeaway :
To schedule WhatsApp messages, you can use third-party automation tools or browser extensions like Skedit. After installing the tool, compose your desired WhatsApp message, select the “Send message through WhatsApp” option, set the time and date, review the settings, and click “Send” to schedule the message. By following these steps, you can schedule WhatsApp messages on Android, iPhone, WhatsApp Web, and WhatsApp Business accounts.
Basic Steps to Schedule WhatsApp Messages
Basic steps to schedule whatsapp messages
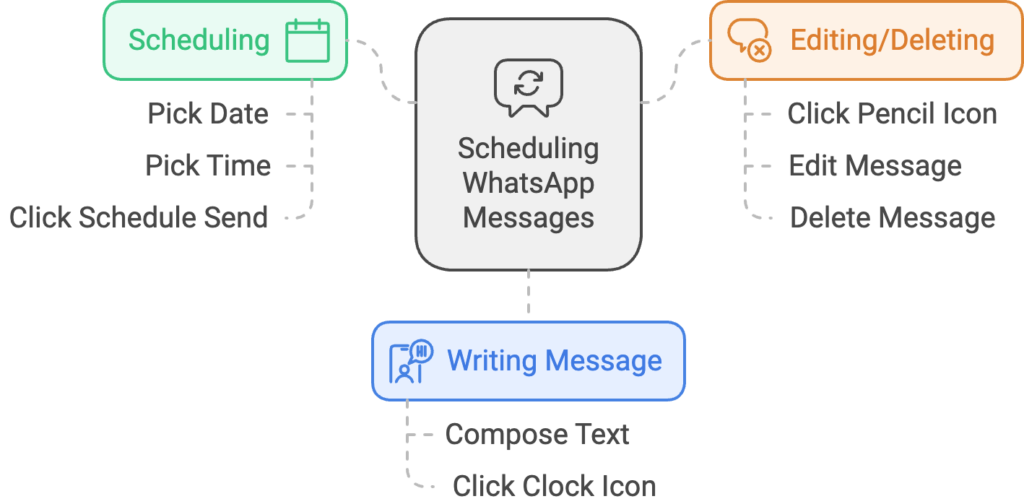
These are the basic steps followed on all platforms to schedule Whatsapp messages. The following sections will find the methods for detailed steps on every platform.
- First, write your message, then click on the clock icon.
- Then you can set a scheduled message by picking the date and time when you want to send your message.
- After that, click “Schedule Send.”
- By clicking on the pencil icon, you can edit or delete your messages at any time by just going into an appropriate chat.

Steps to Schedule Whatsapp Messages on Android Device
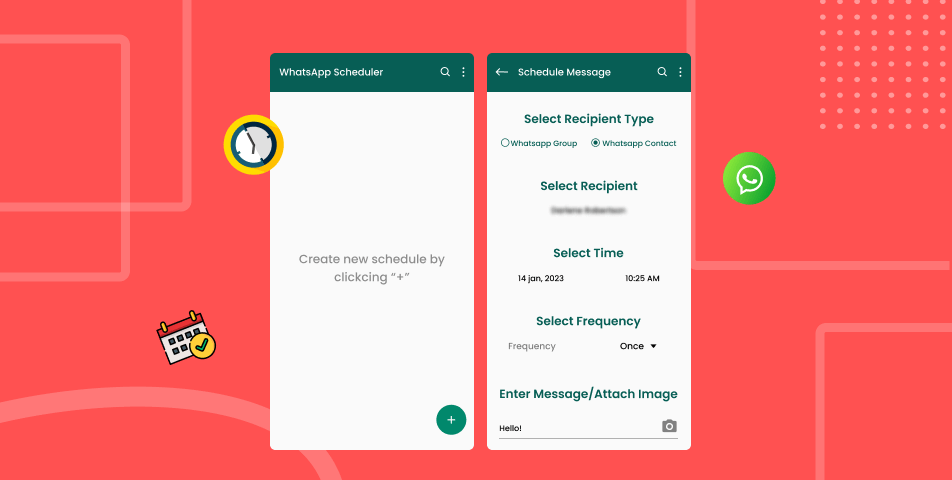
- Firstly, install the Whatsapp Message Scheduler app from the Play Store.
- Once the app is installed, sign in and register your account.
- Now, press the “+” icon to schedule the Whatsapp message on an android device.
- You will get an option asking for permissions for app accessibility. Once you have enabled the accessibility, you can go further and schedule messages.
- Click the ‘Add Recipients” option to add the people you wish to send messages to. If your list of people is extensive, there is an option to upload the CSV file too. But for this feature, you must have a premium account.
- A pop-up message will appear asking if you wish to choose contacts from Phonebook or Whatsapp. As here you want to schedule Whatsapp messages, choose the option “Whatsapp” and click on the OK option.
- Now, the scheduler will direct you to the “Display over other apps” menu and check if this option is turned on or not. Make sure that the display over other apps option for scheduling is enabled.
- Finally, add the recipients from the chats. If you do not have an active chat, click “New Chat” and select the users.
- Once you have selected all the required Whatsapp users, click on the message box and type the text you wish to send.
Checkout How Does Best Ticketing System Works in Help Desk Software?
- Finally, click on the “Schedule” option, and you are done. You can also use third-party apps to schedule recurring messages, as this feature is not natively supported on WhatsApp.
How to Schedule WhatsApp Messages on iPhone?
This feature is only available on business Whatsapp, and you need to follow the given steps for scheduling WhatsApp messages:
- The first step is to open your WhatsApp Business.
- In the next step, go to the setting of your WhatsApp.
- Now, click on the Business Tools option.
- Then you should click on Away Message.
- Then tap on Send Away message.
- To send your message to selective people, you must select the Only Send to in the Recipients option.
- The next step is to tap on Schedule.
- Select the Custom Schedule and specify the start and end date.
For iPhone users, the Shortcuts app can simplify the process of scheduling WhatsApp messages while maintaining user privacy.
How to Schedule Whatsapp Messages on Whatsapp Web?
Apart from scheduling Whatsapp messages on Android and iOS, you can schedule Whatsapp messages on Whatsapp Web too. These steps will remain the same in both Whatsapp and Whatsapp Business accounts.
- Install the extension Whatsapp Message Scheduler from the Chrome Web Store. This is a Google Chrome extension, so if you do not use Google Chrome, you need to install it first. Doing so will automate the process of sending messages from the Whatsapp Web Client.
- The next step is to login into your Whatsapp account through Whatsapp Web. After activating the extension, the UI will look a bit different. You will see various options like:
- Task Menu
- Login Menu
- Menu to open Whatsapp Scheduler
Option to schedule a message from the current participant/group
- You can do various things using the Whatsapp scheduler. You can schedule a Whatsapp message to an individual or a group(broadcast).
A. Steps to Schedule Whatsapp Messages to Individual
- First, click on the scheduling icon, and you will get a pop-up asking the time and date of scheduling the message to the group or individual.
- Select the desired date and time and type the message to schedule.
- Finally, click on the “Schedule Send” option to manage your scheduled messages.
B. Steps to Schedule Whatsapp messages to a group
- The first step is to click on the Broadcast option in the Whatsapp Web Scheduler menu.
- Once you log in to your account, you will get three options- Templates, Lists, and Campaigns.
Checkout What Is Chatbot Marketing? Benefits, Strategies, and New Trends for 2024
- Now, type a name for your broadcast message to schedule and create a list of your Whatsapp contacts who will receive the broadcast message.
- Finally, type the message and click on “Schedule Broadcast.” The WhatsApp schedule message feature is a crucial tool for enhancing communication efficiency, allowing you to automate messages for timely delivery and consistency in group messaging.
Steps to Schedule Whatsapp Messages on Whatsapp Business

There are three options to schedule WhatsApp messages if the user has a WhatsApp Business app account. These are quick replies, away messages, or greeting messages. These messages cannot be delivered on a specific date and time. But, these are the automated responses sent whenever you get any message on your business account. Follow these quick steps below if you wish to schedule a WhatsApp message on a business account.
- The first step is to go to your WhatsApp Business account’s “Business Tools” option. This option is found at More in Android and Settings on iOS. Also Read: How can you Insert a WhatsApp Link to your Instagram Bio?
- The next step is to choose from the three options “Greeting message,” “Away message,” or “Quick replies” options. Choose one as per needs to schedule a WhatsApp message.
- After choosing the option, select the recipients to whom you want to send these messages.
- Type the greeting message or the quick replies you want to send. These options and steps will be the same for Android and iOS devices.
How To Schedule WhatsApp Messages On WhatsApp Web?
Here is the step-by-step guide to scheduling Whatsapp on Whatsapp Web. If you are not using Android and iPhone for sending messages to your customers on Whatsapp, then you can schedule Whatsapp Web messages like mentioned below.
Step 1:
Choose a Third-Party Automation Tool To schedule WhatsApp messages on WhatsApp Web, you’ll need to use a third-party automation tool or browser extension. There are several options available, so choose one that suits your needs and is compatible with your browser. For this guide, we’ll use the hypothetical “Skedit” automation app as an example.
Step 2:
Install the Automation Tool Once you’ve selected the automation tool, install it on your computer. Follow the installation instructions provided by the app. After installation, you may need to enable the toggle in your browser’s settings to allow the tool to run without your permission.
Open WhatsApp Web Go to the official WhatsApp Web website and log in using the QR code. Make sure your Android or iPhone is connected to the internet and has sufficient battery life.
Step 4:
Compose Your Message Navigate to the chat where you want to schedule a message. Type the message that you want to send in the text field. You can also attach photos or videos if desired.
Step 5:
Schedule the Message Click on the “Skedit” icon below the text field to access the scheduling options. A drop-down menu will appear with options to schedule your message. Select the “Send message through WhatsApp” option.
Step 6:
Set the Time and Date In the message details section, press the “Time of Day” option to set the specific time you want the message to be sent. Choose the date and time for the message to be delivered.
Step 7:
Review the Settings Before scheduling the message, review the settings. If you want to be prompted before the message is sent, enable the “Ask me before sending” option by clicking the “Ask” toggle.
Step 8:
Confirm and Schedule Once you’ve set the time and date and reviewed the settings, click the “Send” button to schedule the message. The automation tool will take care of sending the message automatically at the scheduled time.
Checkout The Power of Customer Support for DTC Brands: A Key to Success in 2024
Keep in mind that this guide is based on a hypothetical automation tool, and the actual steps may vary depending on the tool you choose. Additionally, as third-party tools are not officially endorsed by WhatsApp, use them with caution and review their permissions and privacy policies.
By following these steps, you can schedule WhatsApp messages on WhatsApp Web and enjoy the convenience of sending messages automatically at the time you choose.
Conclusion: Schedule Whatsapp Messages using these tactics
Scheduling messages can be very helpful in our hectic lives. Whether you use Whatsapp for business purposes or personal use, you can schedule messages for events, birthdays, or anything you want. We hope now you are aware of how to schedule Whatsapp messages for Android, iPhone, Whatsapp web, and business accounts. Scheduling a WhatsApp welcome message when a user joins a platform is crucial for maintaining effective communication with new clients. We have given a step-by-step guide to help you simply understand Whatsapp message scheduling. So, now you can easily schedule Whatsapp messages as per your needs for both Whatsapp and Whatsapp Business accounts.


